Create a Calendar Event
This tutorial walks you through creating a new event in SOGo 5's calendar, including setting time, adding attendees, and configuring reminders.
Prerequisites
- A SOGo 5 account with valid credentials
- You are logged into SOGo 5
Step-by-Step Instructions
Step 1: Open the Calendar Module
In the sidebar navigation on the left, click Calendar to open the calendar view.
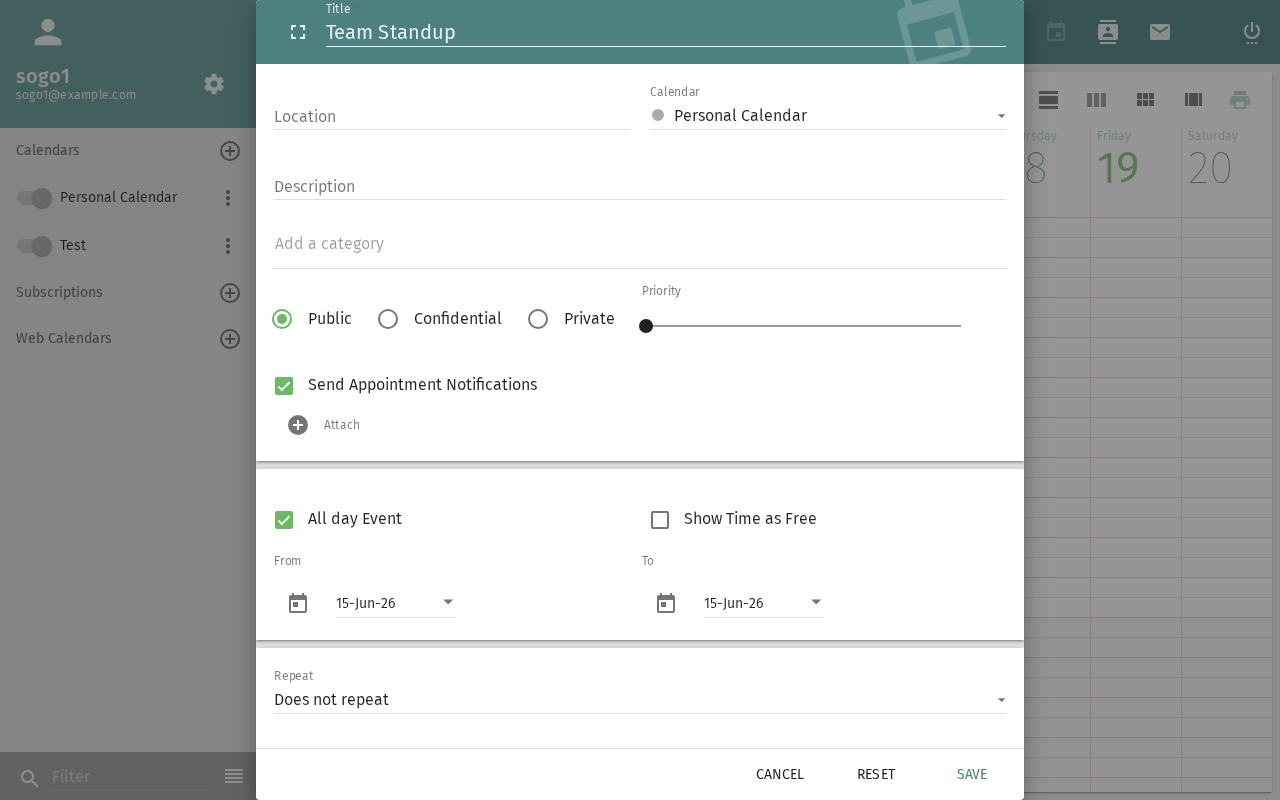
The calendar opens in Week view by default. You can switch between Day, Week, Month, and Year views using the buttons in the top toolbar.
Step 2: Create a New Event
There are three ways to create an event:
| Method | Action: Create event using different methods |
|---|---|
| Click the + button | Click the + (plus) button in the top toolbar |
| Double-click | Double-click on any time slot in the calendar grid |
| Use the date picker | Click a date in the mini-calendar on the left, then click + |
Choose whichever method you prefer. A new event dialog will appear.
Step 3: Enter Event Details
Fill in the event details:
| Field | Description: What to enter in this field | Example |
|---|---|---|
| Title | A short name for your event | "Team Standup" |
| Location | Where the event takes place | "Conference Room B" |
| Start | Date and time the event begins | Today at 10:00 |
| End | Date and time the event ends | Today at 11:00 |
| Calendar | Which calendar to save to | "Personal" |
| Category | A color-coded category | Meeting (blue) |
For all-day events (e.g., birthdays, holidays), toggle the All-day switch. The time fields will be disabled.
Step 4: Add Attendees (Optional)
If you want to invite other people:
- Click the Attendees section to expand it
- Start typing a colleague's name or email address
- Select the person from the auto-complete suggestions
- Choose their participation role:
- Required — Must attend
- Optional — Welcome but not required
- Repeat for each additional attendee
SOGo 5 will send an email invitation to each attendee when you save the event.
Step 5: Set a Reminder (Optional)
To receive a reminder before the event:
- Click the Alarm section to expand it
- Choose when to be reminded:
- 15 minutes before (default)
- 30 minutes before
- 1 hour before
- 1 day before
- Custom — enter your own time
- Choose the reminder method:
- Display — A popup notification in SOGo 5
- Email — An email sent to your address
Step 6: Add a Description (Optional)
Use the Description field to add notes, an agenda, or preparation instructions for the event. This field supports plain text.
Step 7: Set Recurrence (Optional)
For events that repeat, click the Repeat section and choose a pattern:
| Pattern | Example: Recurrence pattern description |
|---|---|
| Daily | Standup meeting every day |
| Weekly | Team meeting every Tuesday |
| Bi-weekly | Sprint review every two weeks |
| Monthly | Department meeting first Monday of each month |
| Yearly | Birthday or anniversary |
You can also set an end date for the recurrence (e.g., repeat until the end of the semester).
Step 8: Save the Event
Click Save or OK (depending on your SOGo 5 version) to create the event.
The event will appear on your calendar. If you added attendees, they will receive an email invitation that they can accept or decline.
Conclusion
You have successfully created a calendar event. You can now:
- Share your calendar with others
- Edit the event by clicking on it
- Drag and drop to reschedule
- Resize the event by dragging its edges to change duration
Accessibility
Keyboard Navigation
SOGo 5 supports full keyboard navigation for calendar events.
| Action | Keyboard Shortcut: What key to press | Notes: Additional information |
|---|---|---|
| Navigate to Calendar | Alt+M, Tab to Calendar | |
| New event | e | |
| Switch views | d, w, m, y | |
| Navigate calendar | Arrow keys | |
| Select time slot | Enter | |
| Next/prev day | J / K | |
| Open dialog | Enter | |
| Save event | Ctrl+S or Enter |
Screen Reader Workflow
This section describes creating a calendar event using keyboard and screen reader.
Step 1: Navigate to Calendar Module
TaborAlt+Mto reach sidebar- Arrows to "Calendar" -
Enterto activate - Screen reader: "Calendar, week view"
- Arrows to navigate to desired day
Step 2: Create Event (Three Methods)
Method 1: Plus button
eorShift+Eto focus New Event button- Screen reader: "New Event, button"
Enterto activate - opens event dialog
Method 2: Double-click time slot
- Arrows to navigate calendar grid (navigation described below)
- Locate desired time slot (e.g., Monday 10:00)
- Double-click with
Entertwice quickly OR useShift+EnterthenEnter - Screen reader: "Event dialog, Title field, edit"
Method 3: Date picker plus button
Tabto mini-calendar on left side- Arrows to select date -
Enterto choose - Tab to plus button -
Enterto create event
Step 3: Complete Event Form
Form fields appear in this order (screen reader focus sequence):
-
Title field - required
- Type event name, e.g. "Team Standup"
Tabto next field
-
Location field - optional
- Type location, e.g. "Conference Room B"
Tabto next field
-
Start time - format: date selector → time selector
- Arrows to select date from dropdown
Enterto confirm, then select timeTabto next field
-
End time - same format as start
-
Calendar dropdown - select "Personal"
-
Category dropdown - select color-coded category
-
Attendees section - optional
- For adding people:
Tabto Attendees,Enterto expand - Type first letters of name,
Arrowto choose Enterto select
- For adding people:
-
Alarm/Reminder section - optional
Tabto Alarm,Enterto expand- Choose timing with
Arrowkeys,Enterto select
Step 4: Save Event
Tabto Save button- Screen reader: "Save, button"
Enterto activate
Step 5: Verify Event Saved
- Screen reader announces: "Event saved"
- Event appears on calendar at selected time
- You can
Tabto event title to open and read details
Common Screen Reader Announcements:
| Announcement: What screen reader says | Meaning: What it means | Action: What to do |
|---|---|---|
| "Event dialog, Title field" | Dialog opened, focus on title | Enter event details |
| "Title is invalid" | Empty or too short title | Enter a proper title |
| "End time must be after start" | Time conflict with itself | Adjust end time later |
| "Attendee not found" | Invalid email address entered | Fix the email or search contacts |
| "Event saved" | Success! | Event created on calendar |
| "Calendar updated" | Existing event modified | Changes saved successfully |
Keyboard Shortcuts in Event Dialog:
Ctrl+EnterorCmd+Enter→ Save and closeEscape→ Cancel/discardTab→ Next fieldShift+Tab→ Previous fieldCtrl+Shift+S→ Save (alias)
Visual Content Descriptions
calendar-create-event.png: This 6-second animated GIF shows creating a calendar event in SOGo 5's week view.
- Frame 1 (0-1.2s): Calendar grid in week view with Monday 10:00 highlighted (focus ring)
- Frame 2 (1.2-2.4s): Event dialog opens from double-click, cursor in Title field
- Frame 3 (2.4-3.6s): Title "Team Standup" and location "Conference Room B" entered
- Frame 4 (3.6-4.8s): Alarm/Reminder section expanded, "15 minutes before" selected
- Frame 5 (4.8-6.3s): Save button clicked, event appears on calendar grid labeled "Team Standup" at Monday 10:00
Screen Reader Alternative: If you cannot view this GIF, please use the Screen Reader Workflow section above. It provides the same information in text format suitable for screen readers.
Duration: 6.3 seconds, 5 frames
File size: 171 KB
High Contrast Mode
SOGo 5 currently does not have built-in high contrast mode. Workarounds for low-vision users:
Browser/OS-Level High Contrast:
- Windows:
Win+Ctrl+Ctoggles high contrast → Settings → Ease of Access → High Contrast - macOS:
System Preferences → Accessibility → Display → Increase contrast - Browser Extensions: Dark Reader, High Contrast (Chrome)
SOGo Color Palette (for plugin authors or CSS overrides):
Calendar events: Blue (#0066cc), Green (#28a745), Yellow (#ffc107), Red (#dc3545)
Week view cells: White (#ffffff) with gray borders
Current time indicator: Red (#dc3545)
Selected/focused: Light blue background (#e6f2ff)
Text: Black (#000000) on light, White (#ffffff) on dark buttons