Mail Signatures & Identities
Configure professional email signatures and manage multiple sender identities (e.g., work vs. personal email).
Part 1: Creating an Email Signature
Step 1: Open Settings
- Click the gear icon ⚙ (Settings) in the top toolbar
- Select Mail → Signatures
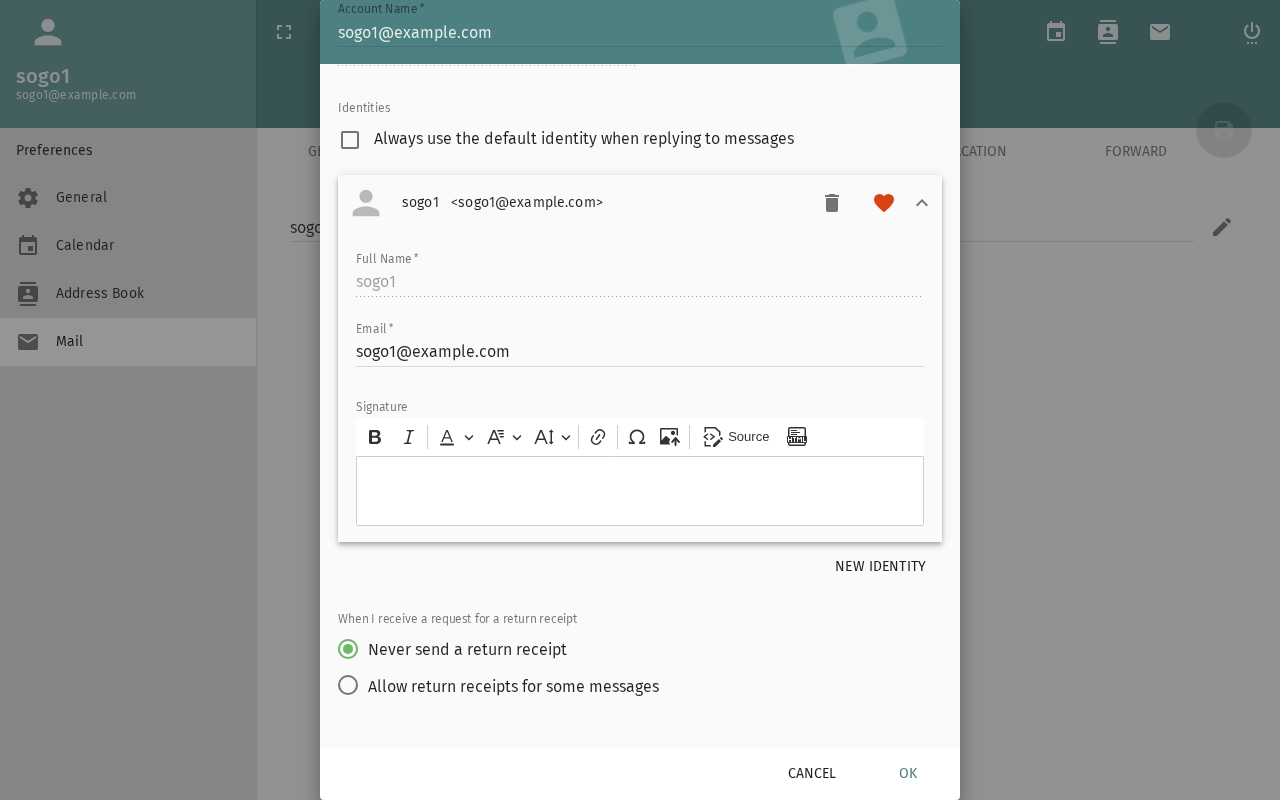
Step 2: Add a New Signature
Click Add Signature or the + button.
Step 3: Write Your Signature
Enter your signature text. SOGo 5 supports plain text signatures.
Recommended signature format:
Best regards,
John Doe
Project Manager | Company Name
Phone: +49 123 456 789
Email: john.doe@company.com
Step 4: Choose Signature Placement
Select when the signature is inserted:
| Option | Behavior: How signature is inserted |
|---|---|
| Append to new messages only | Signature added to new emails, not replies |
| Append to all messages | Added to both new and replied/forwarded messages |
| No automatic insertion | Manually insert via the compose toolbar |
Step 5: Set as Default
If you have multiple signatures, choose which one is used by default.
Step 6: Save
Click Save to apply.
Part 2: Inserting Signature Manually
When composing a message, you can insert a signature:
- Click the Signature button in the compose toolbar
- Select which signature to insert
- The signature is added at your cursor position
Part 3: HTML Signatures (Advanced)
SOGo 5 primarily supports plain text signatures. For rich signatures with images or formatting:
- Create your HTML signature in an external editor
- Copy the formatted content (e.g., from Gmail or Outlook)
- Paste it into the signature field — SOGo 5 preserves basic formatting
Best practice: Keep signatures plain text for maximum compatibility across email clients.
Part 4: Managing Identities
Identities let you send email as different addresses from the same SOGo 5 account.
Step 1: Open Settings
Go to Settings → Mail → Identities
Step 2: View Your Identities
You'll see your primary identity (the email address associated with your SOGo 5 account). Additional identities may appear if configured by your administrator.
Step 3: Add an Auxiliary Identity
If enabled by your administrator (SOGoMailAuxiliaryUserAccountsEnabled):
- Click Add Identity
- Enter:
- Full Name — Display name for recipients
- Email Address — The address to send from
- Reply-to Address — (optional) Different address for replies
- Click Save
Step 4: Switch Identity When Composing
When writing a new message:
- Look for the From field in the compose window
- Click the dropdown arrow next to your email address
- Select which identity to send as
Example: Work + Personal Setup
Identity 1 (Default):
  Name:  John Doe
  Email: john@company.com
  Signature: Professional (title, phone, company)

Identity 2 (Auxiliary):
  Name:  John D.
  Email: john.doe@gmail.com
  Signature: Casual (name only)

When composing a personal email, switch to Identity 2.
Work emails default to Identity 1.
Conclusion
Signatures and identities help you communicate professionally. Set up a clean signature and add auxiliary identities if you manage multiple email addresses.
Accessibility
Keyboard Navigation
SOGo 5 supports full keyboard navigation for managing signatures and identities.
| Action | Keyboard Shortcut: What key to press | Notes: Additional information |
|---|---|---|
| Open Settings | Alt+S or Tab to gear icon, Enter | Top toolbar |
| Navigate to Mail section | Tab through settings sidebar | Arrow keys to Mail option |
| Navigate to Signatures | Tab or arrow keys to Signatures link | Under Mail settings |
| Navigate to Identities | Tab or arrow keys to Identities link | Under Mail settings |
| Add new signature | Tab to Add Signature button, Enter | Opens signature editor |
| Focus signature name field | Tab | First field in editor |
| Focus signature text area | Tab | Body of the signature |
| Save changes | Tab to Save button, Enter or Ctrl+S | Applies settings |
| Insert signature in compose | Alt+I or Tab to Signature button | In compose toolbar |
| Switch sender identity | Tab or Shift+Tab to From dropdown | In compose window |
| Delete signature | Tab to delete / remove button, Enter | Confirm deletion |
| Close settings | Escape | Returns to main interface |
Screen Reader Workflow
Creating an Email Signature
Step 1: Open Settings
Tabto the gear icon (Settings) in the top toolbarEnterto open settings- Screen reader: "Settings menu"
Step 2: Navigate to Mail → Signatures
Tabthrough the settings sidebar to "Mail" optionEnterto expand Mail options- Arrow keys or
Tabto "Signatures" link Enterto open signature management- Screen reader: "Mail Signatures"
Step 3: Add a New Signature
Tabto "Add Signature" or "+" buttonEnterto create new signature- Screen reader: "Add Signature, dialog" or "New signature, edit"
Step 4: Name and Write Your Signature
Tabto the signature name field- Type a name (e.g., "Professional")
Tabto the signature text area- Type your signature content (name, title, contact info)
- Screen reader: "Name, edit" then "Signature, content editable"
Step 5: Set Signature Placement
Tabto placement dropdown- Arrow keys to select option: "Append to new messages only", "Append to all messages", or "No automatic insertion"
- Screen reader: "Placement, combo box, [selected option]"
Step 6: Set as Default (Optional)
Tabto default signature dropdown if available- Arrow keys to select your preferred default
- Screen reader: "Default signature, combo box"
Step 7: Save the Signature
Tabto the "Save" buttonEnterto apply changes- Screen reader: "Signature saved" or "Mail Preferences Saved"
Switching Sender Identity (When Composing)
Step 1: Open Compose Window
- From inbox, press
corTabto Compose button,Enter
Step 2: Change From Address
Tabbackwards (Shift+Tab) from To field to locate the From field- Screen reader: "From, combo box, [current address]"
Enteror arrow keys to expand dropdown- Arrow keys to select different identity
Enterto confirm selection- Screen reader: "From, [selected identity]"
Common Screen Reader Announcements:
| Announcement: What screen reader says | Meaning: What it means | Action: What to do |
|---|---|---|
| "Mail Signatures, heading" | Signature settings page loaded | Proceed to add or edit signatures |
| "Add Signature, button" | Create new signature | Press Enter to start |
| "Signature, edit" | Signature text area focused | Type your signature content |
| "Placement, combo box" | Signature insertion mode | Arrow keys to choose option |
| "Save, button" | Changes ready to apply | Press Enter to save |
| "Mail Preferences Saved" | Settings updated successfully | Continue to next task |
| "From, combo box" | Sender identity selector | Arrow keys to change identity |
| "Delete signature, button" | Remove this signature | Press Enter, confirm |
Visual Content Descriptions
mail-signatures.png: This 3-second animated GIF shows creating a new email signature in SOGo 5.
- Frame 1 (0-1s): Settings screen with Mail → Signatures selected, cursor hovering over "Add Signature" button
- Frame 2 (1-2s): Signature editor open with name field filled ("Professional") and user typing signature text (name, title, contact info)
- Frame 3 (2-3s): Save button clicked, signature appears in the signatures list with confirmation message
Screen Reader Alternative: If you cannot view this GIF, please use the Screen Reader Workflow: Creating an Email Signature above. It provides the same information in text format suitable for screen readers.
Duration: 3 seconds, 3 frames
File size: 22 KB (approximate)
High Contrast Mode
SOGo 5 currently does not have built-in high contrast mode. Workarounds for low-vision users:
Browser/OS-Level High Contrast:
- Windows:
Win+Ctrl+Ctoggles high contrast → Settings → Ease of Access → High Contrast - macOS:
System Preferences → Accessibility → Display → Increase contrast - Browser Extensions: Dark Reader, High Contrast (Chrome)
Signature Settings Accessibility: All form fields (name, text area, placement) have associated labels. Use Tab to navigate between fields. Screen readers announce field labels and current values. The Signatures list supports standard keyboard navigation with arrow keys and Enter to activate.