Compose and Send an Email
This tutorial covers the basics of composing and sending emails using SOGo 6's webmail interface.
Prerequisites
- A SOGo 6 account with valid credentials
- You are logged into SOGo 6
Step-by-Step Instructions
Step 1: Open the Mail Module
In the sidebar navigation on the left, click Mail to open your inbox.

Your inbox shows received messages in the main view, with folders (Inbox, Sent, Drafts, Trash) listed in the left panel.
Step 2: Start a New Message
Click the Compose button in the toolbar above your message list.
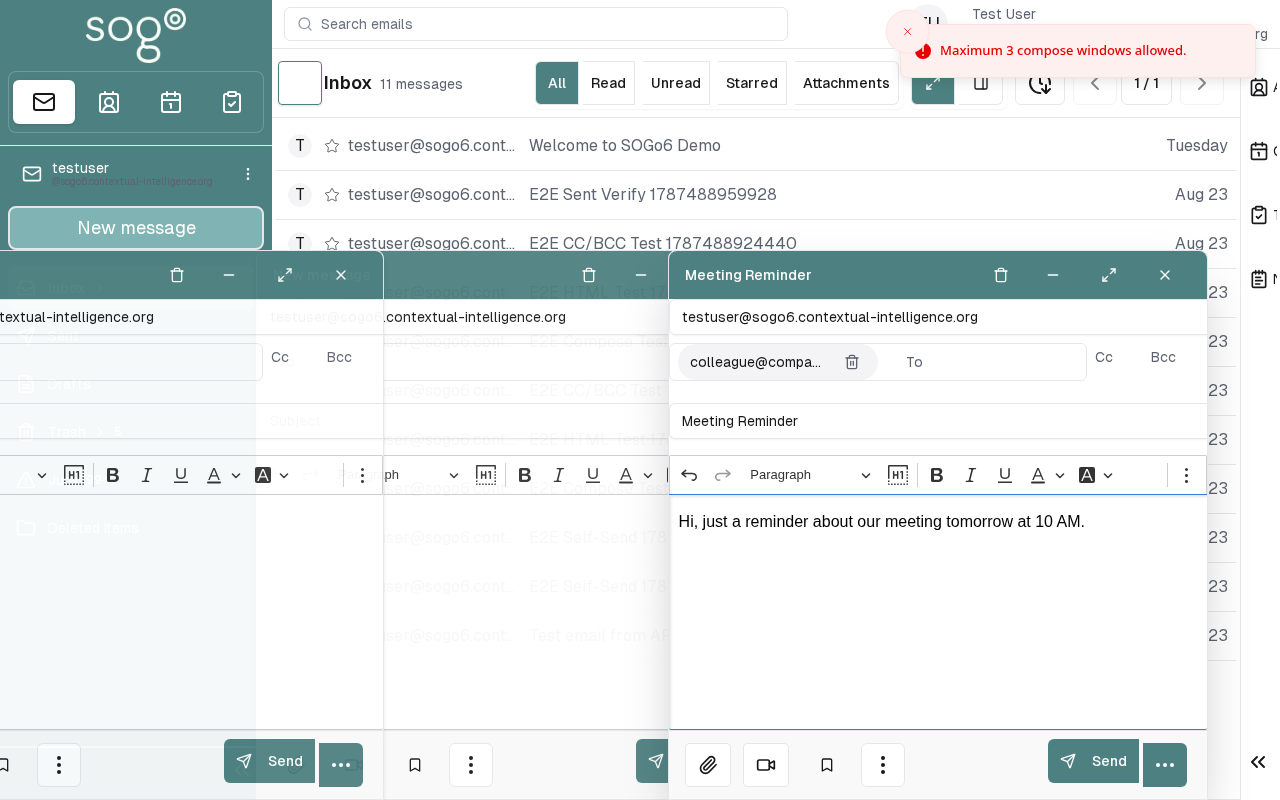
A new message composition window will open.
Step 3: Address Your Message
Fill in the recipient fields:
| Field | Description |
|---|---|
| To | Primary recipient(s). Separate multiple addresses with commas or semicolons |
| Cc | Carbon copy — recipients receive a copy, visible to others |
| Bcc | Blind carbon copy — recipients receive a copy, hidden from other recipients |
Tips:
- Start typing a name — SOGo 6 will suggest matching contacts from your address book
- You can also enter full email addresses directly
- Use Cc for people who need to be informed but are not directly responsible
- Use Bcc for mailing lists or when recipients should not see each other
Step 4: Write a Subject
Enter a clear, concise subject line in the Subject field.
Good subject lines help recipients understand the purpose of your email. Examples:
- ❌ "Meeting"
- ✅ "Sprint Planning — Tuesday 10:00"
- ❌ "Question"
- ✅ "Question about calendar sharing permissions"
Step 5: Write Your Message
Type your message in the large text area. The toolbar above provides formatting options:
| Button | Action |
|---|---|
| B | Bold |
| I | Italic |
| U | Underline |
| Link | Insert a hyperlink |
| List | Create a bullet or numbered list |
| Attachment 📎 | Attach a file |
To attach a file:
- Click the Attach button (paperclip icon)
- Select a file from your computer
- The file will upload and appear as an attachment in your message
Step 6: Set Priority (Optional)
If your message is time-sensitive, you can set a priority level:
- Click the Priority button in the toolbar
- Choose Low, Normal, or High
High-priority messages will show a red exclamation mark ❗ in the recipient's inbox.
Step 7: Send the Message
Once your message is complete:
- Review the recipient, subject, and content
- Click Send
SOGo 6 will deliver the message. A copy is saved in your Sent folder.
Step 8: Save as Draft (Optional)
If you are not ready to send:
- Click Save as Draft instead of Send
- The message is saved in your Drafts folder
- To continue later, open the Drafts folder and click the message
Troubleshooting
Message won't send
- Check that To field has at least one valid recipient
- Large attachments may exceed server size limits (typically 25 MB)
- Check your internet connection
Recipient not found
- Verify the email address is correct
- The auto-complete searches your contacts, not the global directory
- Enter the full email address manually
Conclusion
You have successfully composed and sent an email in SOGo 6. You can now manage your inbox, organize messages into folders, and set up email filters for automatic sorting.
Accessibility
Keyboard Navigation
SOGo 6 supports full keyboard navigation for composing and sending emails.
| Action | Keyboard Shortcut | Notes |
|---|---|---|
| Navigate to Mail | Alt+M, Tab to sidebar, select Mail | |
| New message / Compose | c | |
| Focus To field | Tab | |
| Focus Cc field | Tab or Ctrl+Shift+C | |
| Focus Bcc field | Tab or Ctrl+Shift+B | |
| Focus Subject field | Tab | |
| Focus message body | Tab | |
| Send message | Ctrl+Enter or Tab to Send button | |
| Save as Draft | Ctrl+S | |
| Attach file | Ctrl+Shift+A | |
| Bold | Ctrl+B | |
| Italic | Ctrl+I | |
| Underline | Ctrl+U | |
| Cancel / Close | Escape |
Screen Reader Workflow
Step 1: Navigate to Mail Module
Alt+MorTabto sidebar navigation- Arrow keys to "Mail" -
Enterto activate - Screen reader: "Mail module, inbox view"
Step 2: Open Compose Window
cto open new message compose window- Screen reader: "Compose, new message window"
- Alternatively:
Tabto "Compose" button,Enterto activate
Step 3: Address the Message
Form fields in focus order:
-
To field - required
- Type recipient email address or start typing a contact name
- Screen reader: "To, edit, editable combobox"
Tabto next field
-
Cc field - optional
- Type carbon copy recipients
Tabto next field
-
Bcc field - optional
- Type blind carbon copy recipients
Tabto next field
Step 4: Write Subject
- Type a clear subject line
Tabto next field- Screen reader: "Subject, edit"
Step 5: Write Message Body
- Type your message in the large text area
- For formatting:
Ctrl+B(bold),Ctrl+I(italic),Ctrl+U(underline) - Screen reader: "Message body, content editable"
Step 6: Attach Files (Optional)
Ctrl+Shift+Ato open file picker- Navigate to file using standard file dialog
- Select file and confirm
- Screen reader: "Attachment, filename.ext"
Step 7: Send or Save as Draft
- Send:
Ctrl+EnterorTabto Send button,Enterto activate - Save as Draft:
Ctrl+S - Screen reader: "Message sent" or "Message saved to drafts"
Common Screen Reader Announcements:
| Announcement | Meaning | Action |
|---|---|---|
| "To, editable combobox" | Recipient field ready | Type email or contact name |
| "Subject, edit" | Subject line ready | Type subject |
| "Message body, content editable" | Email body ready | Type your message |
| "Attachment, button" | File attached | File is ready to send |
| "Message sent" | Success | Email delivered |
| "Message saved to drafts" | Draft saved | Can continue later from Drafts |
Keyboard Shortcuts in Compose Window:
Ctrl+Enter→ Send messageCtrl+S→ Save as DraftCtrl+Shift+A→ Attach fileEscape→ Cancel / discardTab→ Next fieldShift+Tab→ Previous field
Visual Content Descriptions
mail-compose.png: This 4-second animated GIF shows composing and sending an email in SOGo 6.
- Frame 1 (0-1s): Inbox view with Compose button highlighted in the toolbar
- Frame 2 (1-2s): Compose window opens with cursor in To field, user types recipient email
- Frame 3 (2-3s): Subject line entered, message body being typed
- Frame 4 (3-4s): Send button clicked, message sent confirmation, email appears in Sent folder
Screen Reader Alternative: If you cannot view this GIF, please use the Screen Reader Workflow section above. It provides the same information in text format suitable for screen readers.
Duration: 4 seconds, 4 frames
File size: 28 KB (approximate)
High Contrast Mode
SOGo 6 supports theme customization (light/dark mode) via user preferences. Workarounds for low-vision users:
Browser/OS-Level High Contrast:
- Windows:
Win+Ctrl+Ctoggles high contrast → Settings → Ease of Access → High Contrast - macOS:
System Preferences → Accessibility → Display → Increase contrast - Browser Extensions: Dark Reader, High Contrast (Chrome)
Compose Window Accessibility: All form fields (To, Cc, Bcc, Subject, Body) have associated labels. Use Tab to navigate between fields. Screen readers announce field labels and current values. The formatting toolbar buttons are labeled for screen reader use.